AWS (Amazon Web Services) is the biggest player in cloud market. AWS is first cloud service provider and worldwide adopted. If has all the service and functionality which any organization think of. AWS also comes with lot of default configuration for user ease so that a common user can use it without having much IT Infra knowledge.
However, lot of professional wants to create and configure AWS resource according to their design without go with default settings. Let’s go through all the component which requires to launch an AWS instance and try to understand each:
As you log into you AWS portal you will get a Dashboard like below. You can see so many components and services which can make you little confuse right now. So let’s discuss few major components before creating an AWS Instance.

AWS Global Infrastructure
It’s not the service offerings we are talking about, but this is the actual infrastructure that construct AWS. AWS runs on it.
Region is the Physical location in the world where AWS resource exists. They have multiple Availability Zones.
Availability Zone consist of one or more data centers or AWS facility area.
You can say that a Region is consist of two or more availability zone.
VPC (Virtual Public Cloud), is an isolated cloud resource with AWS. It’s a virtual network dedicated to your AWS account. You can think of them as isolated Data centers.
EC2 (Elastic Compute Cloud), is the offering to provide you compute services. Here you will get the Virtual Servers in the cloud.
Security Group acts as a virtual firewall that controls the traffic for one or more instances. Security Group consist of one or more security rules which filters and allows your network traffic.
We have many more components which we can cover during the implementation. Let’s start with creating one. As VPC contains our all the resource, so first we are going to create one.
Click Services in top menu and find VPN in Networking & Content Delivery


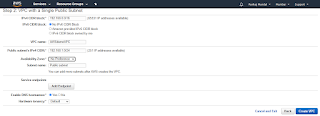
Step 1 is Select a VPC Configuration. There are 4 option which we will discuss on another session. Here we will go with VPC with Single Public Subnet.

Click Select. And You will get basic configuration option.
IPv4 CIDR Block is the rang of IPs to be use for your VPC. We must keep it /16 or /24 subnet. Here I am taking 192.168.0.0/16 subnet.
VPC Name is the name you want to assign to you VPC. In my case I am taking and AWSdemoVPC.
Public subnet's IPv4 CIDR is IP range going to assign to your Virtual Machine. Here I am taking as 192.168.1.0/24.
Rest I am keeping default and click on Create VPC.

See now wizard has created all require component for you.


As our target is to manually create all these components so I am deleting all these and creating it without VPC Wizard.

As you can see, I have deleted our AWSdemoVPC. Now going to creating again with without wizard mode. Let’s click on Create VPC. This time you will get less option then before. I am using same parameter to create VPC. Click on Create.

This time only VPC has been created.

Now it’s time to create a Subnet for it. On Left panel click on Subnets

Click on Create Subnet

Name tag must be the name you want to provide to your subnet. VPC must the one we have created recently. Availability Zone is up to you. Here I am taking ap-south-1a. IPv4 CIDR block must be the segment from associated VCP CIDRs. So, I am using 192.128.1.0/24. Click on Create.

Now time to create an Internet Gateway. Internet Gateway is the component that allows communication between your VPC and the Internet.

Click Create. Now we need to attach IG to VPC.

Select the IG, Click on Action and Attach to VPC.

Select the VPC and Attach. As we attach the IG with VPC, now VPC has the internet connection. But we need route in place between IG and our subnet. So, let’s create a route table. Click on Route Tables.

Select the Route Table ID matching with VPC ID. You will see, Routes has only local routing. Now let’s create one. Click Edit Routes,

Click Add route and select Internet Gateway

Save Routes


Now are good to go with EC2 instance creation. However, I would like to create the Security group. Security group is like firewall and these SG configurations is mandatory for EC2 instance creation.

Open the Security Group and you will get list of existing running security groups. Also option to Create Security Group.

Provide the basic details

Now add the rule to allow traffic. I would be required to open SSH for Linux session and HTTP/Https if need to run any web application. Let’s add rules.
Scroll down and click Add Rule

Add all required rule and click Create Security Group.
Let’s Create a EC2 Instance.

Click Launch Instance, Choose the OS and click Select, Click Next and come to below screen.

Select our configured setting as highlighted. Next with default setting till it asks for Security Group.

Select custom Security Group and Click at Review and Launch. For this we need to create a Key Pair, or we can use existing one. I have existing on so I will use that.

Here we have our new instance having all our custom settings.

We can access the instance using the access key we have download.
Comments
Post a Comment